[Unity]Unity Editor Extensions – Menu Items
參考來源: https://unity3d.com/learn/tutorials/topics/interface-essentials/unity-editor-extensions-menu-items


結果如下:


Adding Menu Items
1
2
3
4
5
6
7 |
public class MenuItems : MonoBehaviour {
[MenuItem("TopTools/Find")]
private static void doSomething()
{
Debug.Log("Find");
}
}
|

1
2
3
4
5
6
7 |
public class MenuItems : MonoBehaviour {
[MenuItem("Window/Find")] private static void doSomething() { Debug.Log("Find"); } } |
Hotkeys
以下是支援的熱鍵(也可以互相合併):
- % – CTRL on Windows / CMD on OSX
- # – Shift
- & – Alt
- LEFT/RIGHT/UP/DOWN – Arrow keys
- F1…F2 – F keys
- HOME, END, PGUP, PGDN
1
2
3
4
5
6
7 8 9 10 11 12 13 14 |
// Add a new menu item with hotkey CTRL-SHIFT-A
[MenuItem("Tools/Find %#a")]
private static void doSomething3(){}
// Add a new menu item with hotkey CTRL-G
[MenuItem("Tools/Find1 %g")]
private static void doSomething4(){}
// Add a new menu item with hotkey G
[MenuItem("Tools/Find2 _g")]
|

Special Paths
Unity 有一些"Special" paths作用於Context menus(menus在點擊右鍵選單顯示)
- Assets – items will be available under the “Assets” menu, as well using right-click inside the project view.
- Assets/Create – items will be listed when clicking on the “Create” button in the project view (useful when adding new types that can be added to the project)
- CONTEXT/ComponentName – items will be available by right-clicking inside the inspector of the given component.
1
2
3
4
5
6
7 8 9 10 11 12 13 14 |
// Add a new menu item with hotkey CTRL-SHIFT-A
[MenuItem("Tools/Find %#a")]
private static void doSomething3(){}
// Add a new menu item with hotkey CTRL-G
[MenuItem("Tools/Find1 %g")]
private static void doSomething4(){}
// Add a new menu item with hotkey G
[MenuItem("Tools/Find2 _g")]
|


Validation
Some menu items only make sense in a given context, and should not be available otherwise. Enabling/disabling menu items according to their usage context is done by adding validation methods.
Validation methods are static methods, marked with the MenuItem attribute, passing true to the validation argument.
The validation method should have the same menu path as the menu it is validating, and should return a boolean value to determine whether the menu item is active or not.
For example, Validation methods can be used to add a right-click menu to Texture assets only under the project view:
1
2
3
4
5
6
7 8 9 10 11 12 |
[MenuItem("Assets/ProcessTexture")]
private static void DoSomethingWithTexture() { Debug.Log("DoSomethingWithTexture"); } [MenuItem("Assets/ProcessTexture", true)] private static bool NewMenuOptionValidation() { //點到的物件必須是相同型態,回傳true才有辦法執行DoSomethingWithTexture return Selection.activeObject.GetType() == typeof(Texture2D); } |
Controlling Order with Priority
Priority is a number that can be assigned to a menu item (passed to the MenuItem attribute) that controls the ordering of menu items under the root menu.
Menu items are also automatically grouped according to their assigned priority in increments of 50:
1
2
3
4
5
6
7 8 9 10 11 12 13 14 15 16 17 18 19 20 21 22 23 24 |
[MenuItem("NewMenu/Option1", false, 1)]
private static void NewMenuOption() { } [MenuItem("NewMenu/Option2", false, 2)] private static void NewMenuOption2() { } [MenuItem("NewMenu/Option3", false, 3)] private static void NewMenuOption3() { } [MenuItem("NewMenu/Option4", false, 51)] private static void NewMenuOption4() { } [MenuItem("NewMenu/Option5", false, 52)] private static void NewMenuOption5() { } |
The code example results in the menu that has 2 groups of items, according to the assigned priority:

Related Classes
MenuCommand
When adding a new menu item to an inspector (using “CONTEXT/Component”, as described above), sometimes it is necessary to get a reference to the actual component (e.g: to modify its data).
This can be done by adding a MenuCommand argument to the static method that defines the new menu item:
1
2
3
4
5
6
7 |
[MenuItem("CONTEXT/RigidBody/New Option")]
private static void NewMenuOption(MenuCommand menuCommand) { // The RigidBody component can be extracted from the menu command using the context field. var rigid = menuCommand.context as Rigidbody; } |
ContextMenu
This attribute allows defining context menu items. This works exactly the same as defining a method with the MenuItem attribute with a path that starts with “CONTEXT/…”.
The difference is that with this attribute, you define the default context menu for a given component, whereas with the MenuItem approach, you “extend” other components’ menus (for example – the default components that are part of the engine).
1
2
3
4
5
6
7 |
public string Name;
[ContextMenu("Reset Name")] private static void ResetName() { Name = string.Empty; } |
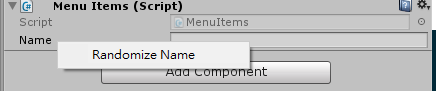
ContextMenuItem
This attribute is added to fields of a component (MonoBehaviour) class, to allow adding context menus at a finer resolution. While the ContextMenu attribute shown above adds context menus at the component level, marking fields with this attribute will add a right-click menu to individual public fields.
Since this attribute is added to a field and not a method, it accepts 2 arguments: the display name of the menu item and a name of a method (instance method) to be invoked when the menu item is selected.
1
2
3
4
5
6
7 |
[ContextMenuItem("Randomize Name", "Randomize")]
public string Name; private void Randomize() { Name = "Some Random Name"; } |

留言
張貼留言